The Big Event! Offers on Paint, Flooring, Doors & more
Skip to content Skip to navigation menu
Basket
0
Main_header_image-Newstalgia.png
Picture shelves provide the perfect place to display artwork, ornaments and even record covers and are a great if you want a gallery wall you can easily change.
Otherimage1--Newstalgia.png
Enhancing a retro feel

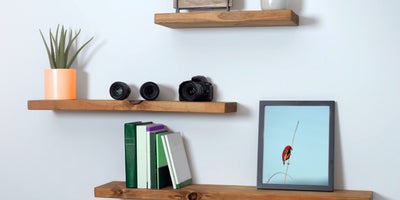
Picture shelves offer an alternative to the gallery wall that’s much more aligned with the style of the Newstalgia trend. It’s all about enhancing a retro feel in a modern setting, and picture shelves provide the perfect place to display artwork, ornaments and even record covers. There are loads of different things you can do with them- using multiple varying lengths adds more visual interest, while grouping items together in odd numbers creates a more balanced look. Make sure they’re hung at eye level to make them a real focal point and use colour to create contrast.

Otherimage2--Newstalgia.png
Test your layout first

Before you start hanging any shelves, gather all of the stuff you want to display on your shelves and test out the layout. This will help to prepare you more when you come to fitting them. Lay the shelves on the floor how you plan to have them on the wall, then play around with your items and see how you can lay them out. It’s also a good time to determine how much height you’ll need between the shelves. If your shelves have differing lengths, you can use that mismatch to your advantage by placing taller items strategically to fill in the gaps.

Otherimage3--Newstalgia.png
Finding your location on the wall

When you’ve picked the wall you’re hanging your shelves on, make sure you go over it with a stud finder. Find all of the studs in the wall and mark them with washi tape or a pencil. Knowing where they are gives you the option to use them to anchor your shelves, as opposed to just screwing them into the plaster. It’s also worth making sure your lowest shelf will be high enough above your sofa or any other furniture. You should be aiming for an 8 to 10 inch gap.

Otherimage4--Newstalgia.png
Fitting the shelves

Try to align the holes on your shelves with the marked studs on the wall, as screwing them to a stud will make them more secure. Start with the middle screw first, and then use a spirit level to check the shelf. Then drive in your remaining screws. When you have your bottom shelf in place, you can again test out the height of the items you’re going to place on it. This lets you make any last minute adjustments or just get a better idea of how it will end up looking. Install your remaining shelves, leave 4 to 6 inches of wall space between the tallest item and the shelf above it.
Otherimage5--Newstalgia.png
Fill your shelves

Now it’s time to add your personal touches and finish off your shelves by filling them. You might want to stick to a colour scheme with the shelves or even the rest of the room. Varying the height of your shelves creates a playful aesthetic, while layering your frames so that they’re slightly overlapping gives them a more cosy, homely look. In true newstalgia fashion, why not fill your shelves with vinyl record sleeves of your favourite album covers as well as vintage books and magazines. Try a hanging plant on your top shelf so that the leaves trail down to the lowest.

More inspiration