Skip to content Skip to navigation menu
Basket
0
varnish-cover-img.jpg

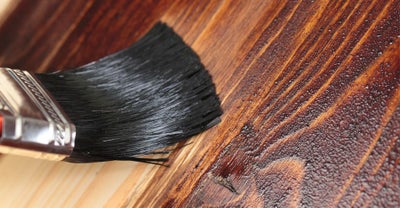
If you have a favourite piece of furniture in the house, you should consider applying varnish to it. A suitable varnish helps prevent damage and provides a layer of protection, meaning the wood looks better and lasts longer. Varnished wood takes in much less moisture, reducing the chances of warping and splitting

Pick a high-quality wood varnish for your wood by browsing our extensive range. You can find outdoor and indoor options, so we’ve got the right product for your project, whether you need to varnish your decking or staircase.

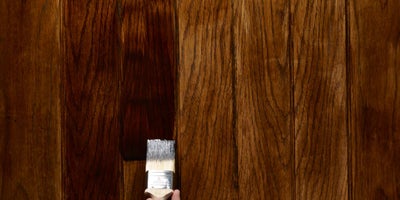
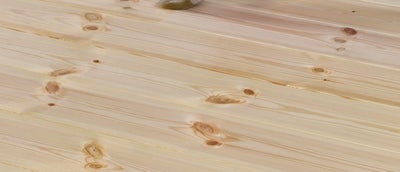
Applying a wood varnish will bring out the natural colour of timber, providing a long-lasting, beautiful deep sheen. If you’re unsure how to varnish wood, this guide will teach you how to:

  • Pick a suitable varnish
  • Prepare a room for applying wood varnish
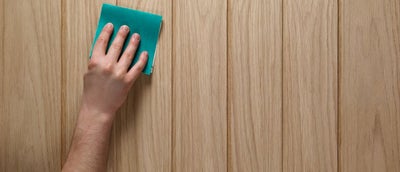
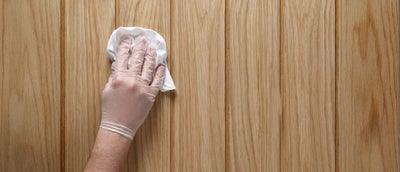
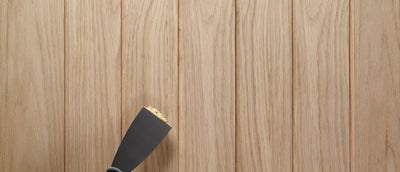
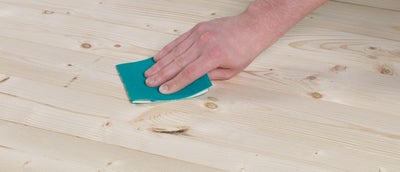
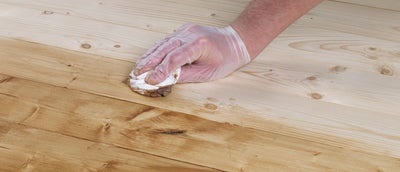
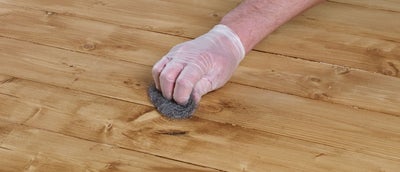
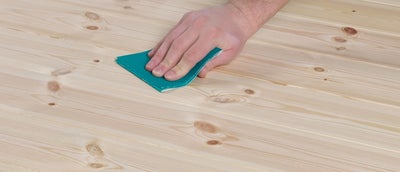
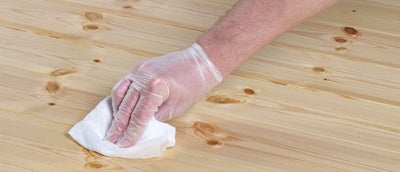
  • Prepare the wood for varnishing
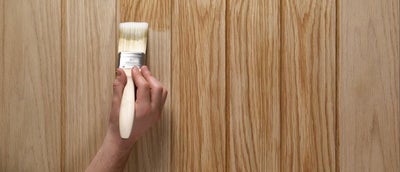
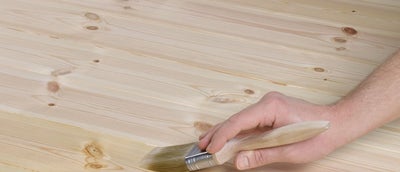
  • Apply varnish effectively

Which varnish should I use?

Picking the proper wood varnish is crucial in ensuring a long-lasting, high-quality finish. Here are the most common types of varnishes:


  • Water-based. These varnishes are a quality all-purpose choice; they have low odour and toxicity and dry faster than oil-based varnish. This varnish works particularly well for indoor wooden furniture and is best applied with a synthetic bristle brush
  • Oil-based. Traditional oil-based varnishes are more durable than water-based alternatives. They can cope better with temperature variations, so they’re more suitable for use on exterior wood. Oil-based varnish takes longer to dry and is best applied with a natural bristle brush
Spray-on. Ideal for DIY beginners, these are easy to apply and don’t need to be thinned. They have strong fumes, so it’s essential to ensure proper ventilation when applying

How do I prepare a room for applying varnish?

    Before preparing the wood itself for varnishing, it’s essential to ensure the surrounding area is suitable for the process:

    • Ensure the room is well-ventilated, as potent fumes can be found in some varnishes. Alternatively, you can apply varnish outdoors on warm days; varnish dries slower in cool or humid conditions
    • Pick a well-lit room, as this will make it easier to cover the wood evenly and spot errors before the varnish dries
    • Clean the surrounding area to minimise dust and dirt. Cover nearby furniture with a dust sheet for protection while you sand the wood
    • Wear protective gloves, goggles and a face mask when applying the varnish

How do I prepare the wood for varnishing?

Varnish adheres to wood more successfully and is more durable if you thoroughly prepare the surface. The wood should be as clean and dry as possible before you start.

Strip the wood

Firstly, remove existing wood varnishes, waxes, oils or stains with a suitable remover or stripper. Then remove grease, dust or dirt with a damp cloth or dry brush.

Fill holes

Fill any holes with a wood filler that’s suitable for varnish. Level with a filling knife and allow to dry completely.

2018-Wickes-How-To-Varnish-Step-1.jpg

Sand the wood

Sand the surface with fine or medium-grain sandpaper. Then clean any dust, as this can settle on newly varnished wood and spoil the finish.

What’s the best way to apply varnish?

How do you get a smooth finish? We have several tips to help you achieve perfectly varnished wood:

Stir the varnish correctly

You should thoroughly and gently stir the varnish before starting. Shaking the tin produces bubbles, making it harder to achieve a smooth finish.

2018-Wickes-How-To-Varnish-Step-2.jpg

Use the right amount of varnish

Avoid overloading your brush, as this can lead to an untidy finish. When brushing the edges of the wood, only dip the tip of the brush into the varnish.

Apply even layers

Apply the varnish evenly with smooth, light brush strokes, working in the direction of the grain.

Remember to tip-off

For the best finish, tip-off after application. This means lightly dragging the tips of an unloaded brush across the wet varnish whilst holding the brush at a steep angle. Tipping off prevents any runs or pools before the varnish starts to dry.

2018-Wickes-How-To-Varnish-Step-4.jpg

Sand the dried varnish

Once you’ve let the wood varnish dry thoroughly, lightly sand with extra fine grain sandpaper, then wipe down with a soft, damp cloth to remove any dust.

How many coats of varnish should I apply?

You can apply as many subsequent coats of wood varnish as you need, but an additional two or three coats is the standard. Remember to tip-off and gently sand between each coat. You may also need to use a thinner with the varnish – refer to the manufacturer’s instructions for the best results.

How to Stain Wood

While a varnish is a protective layer on the outside of wood, a stain will deeply penetrate the wood, changing or enhancing its natural colour grain. Although stains don’t provide as much protection as a varnish, applying to an old piece of furniture is an excellent way of giving it a new lease of life.

Every type of wood is different, so it’s advisable to test on a small area first. This lets you check if the wood will accept the stain and ensure you achieve your desired colour. Browse our selection of wood stains to find the right one for you. Choose from a selection of colours, with products suitable for indoor and outdoor projects. 

In this guide, we’ll talk you through the process of staining wood from start to finish, answering these key questions:

  • How do I choose the right wood stain?
  • How do I prepare wood for staining?
  • Do I have to sand the wood before staining?
  • How do I stain wood?
  • How many coats of wood stain should I apply?

How do I choose the right wood stain?

Key factors to consider when selecting your stain include the type of wood you have, the colour you’d like to achieve and ease of application. Here are the two types of wood stains to choose from:

  • Oil-based stain. This is a popular choice as it penetrates deep into the wood, resulting in a durable finish. It gives an even finish which is perfect for beginners but takes quite long to dry
  • Water-based stain. This is an environmentally-friendly alternative to oil-based stains and does not produce volatile organic compounds (VOCs). As water-based oil dries quickly, it can be tricky to apply evenly

How do I prepare wood for staining?

Just as with any wood finish, there are a few simple but essential steps you need to take to ensure the wood takes the stain properly:

Remove previous finishes

Remove any existing varnishes, waxes, oils or stains with a suitable remover or stripper. Then clean off grease, dust or dirt traces with a damp cloth or a dry brush.

2018-Wickes-How-To-Stain-Step-1.jpg

Fill holes

Fill any holes with a suitable wood filler. Level with a filling knife and allow to dry completely.

Do I have to sand the wood before staining?

You should always sand the wood before staining, ensuring the surface is as smooth as possible and blemish-free. It’s best to use medium or fine-grain sandpaper; between 80 and 120 grit should do it. 

The wood will turn out too dark if the grain’s too rough. But if the grain’s too fine, the wood won’t accept the stain properly.

How do I stain wood?

If you’re unsure how to stain wood, there are a few things you can do to ensure a smooth and high-quality finish:

Clean the surface

Before applying, make sure all the dust from sanding has been wiped away and the surface is clean and dry.

Wet the wood

Wet the wood by wiping it with a damp cloth; this raises the grain for better sanding. Then allow the wood to dry completely.

Stir the stain correctly

Be sure to stir the wood stain properly, but do so gently. Shaking the tin produces bubbles, preventing you from achieving a smooth finish. To avoid an inconsistent finish, you should also stir the container occasionally whilst you’re applying.

2018-Wickes-How-To-Stain-Step-2.jpg

Use the correct application tools

It’s often easier to apply the wood stain using a lint-free cloth or rag rather than a brush. Stain dries quickly, so these tools help with quick application on larger surface areas. If you do use a brush, avoid overloading the bristles.

2018-Wickes-How-To-Stain-Step-3.jpg

Always wipe off the excess wood stain to avoid a sticky, uneven finish.

How many coats of stain should I apply?

2018-Wickes-How-To-Stain-Step-5.jpg

A wood stain can’t usually be removed once it’s applied, so it’s better to apply thin coats and add more. This way, you can build up to your desired colour; the more layers added, the darker the wood will be. Always refer to the manufacturer’s instructions for extra guidance if you’re unsure.

How to Wax Wood

Waxing has long been a traditional method of finishing and protecting wood surfaces. A wax finish produces a distinctive look compared to varnishing or staining and is an effective way of restoring older pieces of furniture. Applying wax can also waterproof your wooden furniture, protecting it from accidental stains and spills. 

Wood wax can be applied over almost every finish, including paint, varnish, oil and stain. However, it’s not advisable to use another finish over the top. This could potentially damage your wood and ruin the finish.

In this guide, we’ll show you how to wax wood by answering these key questions: 

  • What’s the best wood wax?
  • Can I use coloured wax for wood?
  • How do I prepare wood for waxing?
  • What’s the best way to apply wax?
  • How do I look after waxed wood?
Before starting, make sure you have everything needed to wax your wood. Our range of wood treatments includes a variety of wood waxes and application tools.

What’s the best wood wax?

You can use different types of wax depending on your project and the look you want to achieve. Here are the three most common types of wood wax:

  • Beeswax. This wax produces an attractive natural finish and is easy to apply. It’s very soft, so it doesn’t offer much protection; beeswax can remain slightly sticky unless buffed properly
  • Carnauba wax. A popular vegetable wax that produces a long-lasting finish, it can also be added to polish and buffed to a high shine; refer to the manufacturer’s instructions on whether to add to polish
Paste wax. This wax is specially formulated and versatile enough to be used on various projects

Can I use coloured wax for wood?

Depending on the nature of your project, you may wish to use coloured furniture wax such as white, black or antique wax. Before using coloured wax, always apply a layer of clear wax first. Refer to the manufacturer’s instructions for specific details on how best to apply certain colours.

How do I prepare wood for waxing?

2018-Wickes-How-To-Wax-Step-1.jpg

Depending on your project, you’ll need to take a few simple steps before waxing wood. Preparation is straightforward but essential in achieving a high-quality finish. Here’s how you should prepare your wood for waxing:

  • You don’t necessarily need to strip off previous layers of lacquer or wax, especially if you want to retain the wood’s character
  • Start with a clean surface and remove any other stains, grease, dust or dirt with a damp cloth or a dry brush
  • Fill any holes with a suitable wood filler. Level with a filling knife and allow to dry completely

What’s the best way to apply wood wax?

Now that the wood has been adequately prepared, it’s time to apply the wax.

Use the correct application tool

It’s best to use a lint-free cloth to apply wood wax. For a more thorough penetration, 0000-grade steel wool will work more effectively.

2018-Wickes-How-To-Wax-Step-2.jpg

Apply thin layers of wax

Work the wax smoothly into the wood using circular motions. It’s best to apply several thin layers to achieve a more even coating. Thick layers of wax dry unevenly and will look blotchy and dull.

Allow drying

Let the wax dry according to the manufacturer’s instructions. The product will dull as it hardens.

2018-Wickes-How-To-Wax-Step-5.jpg

Buff the wax

Once dried, buff the wax with a clean cloth. Gently rub the wood in circular motions until the shine comes through. Use a softer material to achieve a better shine.

Allow drying again

Wait at least four hours for the wax to harden; for the best results, allow 24 hours. Then repeat the process according to your preference.

How do I look after waxed wood?

Waxed wood is easy to maintain and only needs dusting with a soft cloth to keep it clean. However, if you notice the shine fading, you should reapply the wax. This is usually recommended every six months; refer to the manufacturer’s instructions if you’re unsure.

How to Oil Wood

    Oil is a popular and traditional wood finish. It doesn’t protect the wood as well as a varnish, but oil brings out the material’s natural character beautifully. Oil is also easy to apply, and most are non-synthetic and eco-friendly.

    To find the right oil for your project, look at our entire wood treatment range. Here, you’ll find all types of wood oil and the accessories you’ll need for the application.

    Oiling wood is a simple process that DIY beginners can do. In this guide, we’ll show you:

    • The different types of wood oil
    • How to prepare the wood for oiling
    • The best way to apply oil
    • How many coats of oil you’ll need

What oil should I use to condition wood?

    There are three main types of wood oil, each with its own benefits:

    • Danish and teak oil. Quick-drying, suitable for all types of wood and results in a resilient finish; however, these oils need to be re-applied periodically
    • Linseed oil. Takes much longer to dry (between 1 and 3 days per coat), and you’ll need to apply multiple coats to new wood; a linseed oil finish is rich and glossy but isn’t suitable for outdoor wood
    • Tung oil. Generally accepted as a superior natural finish for wood. It results in a superb waterproof finish that’s very durable. Tung oil sometimes requires a more complex application method, so be sure to refer to the manufacturer’s instructions for the best results

How do I prepare the wood for oiling?

    Preparation is vital when oiling wood and can be done in just three easy steps:

Strip previous finishes

Remove any existing varnishes, waxes, oils or stains with a suitable remover or stripper. Then remove grease, dust or dirt with a damp cloth or dry brush.

Fill holes

Fill any holes with a wood filler that’s suitable for a varnish. Level with a filling knife and allow to dry completely.

2018-Wickes-How-To-Oil-Step-1.jpg

Sand the wood

Sand the surface with extra-fine grain sandpaper; 220 grit should do it. This will open up the wood and result in a better finish.

What’s the best way to apply oil?

2018-Wickes-How-To-Oil-Step-2.jpg

If you’re unsure how to oil wood, follow these simple tips to get a high-quality finish:

  • Wood oil can be applied using a brush, lint-free cloth or clean cheesecloth pad; always refer to the manufacturer’s instructions for application
  • Oil needs to be well absorbed, so apply it evenly and liberally, working with the grain of the wood. If you’re using a cloth to apply, rub the oil firmly into the wood using circular motions
  • The longer you rub, the more warmth you’ll generate, which will help the wood absorb the oil. After thoroughly rubbing the wood, remove any excess with a clean, dry cloth

How many coats of oil should I apply?

2018-Wickes-How-To-Oil-Step-3.jpg

Once the first coat of wood oil has completely dried, apply additional coats until the finish is rich and hard. Sometimes you can apply extra coats using extra fine-grit sandpaper, which will help push the oil deep into the wood.

The number of coats you should apply depends on the wood oil you’ve used. Danish or tung oil may only need one or two extra coats, but linseed could require up to 20. Refer to the manufacturer’s instructions for the best method.

2018-Wickes-How-To-Oil-Step-4.jpg

The most important thing to remember when adding extra coats is to let the oil dry entirely before applying the next layer. Drying times can vary drastically depending on the oil type. For Danish or tung oil, a coat will have dried after 12 to 24 hours. However, if you’ve used linseed oil, this can take several days to a week.